Here are the the steps to properly use a Hoyer Lift. A Hoyer Lift makes transferring people easier and with minimal effort. We recommend that only qualified people – or people that have had hands on training use a Hoyer Lift. However, we understand that you may not have the time to get properly trained. So here you go…
Step 1: Practice, Practice, Practice
You should practice using the Hoyer lift before using it on a live patient. If possible place something of weight into the straps and practice.
Some key equipment items that you must understand before transferring:

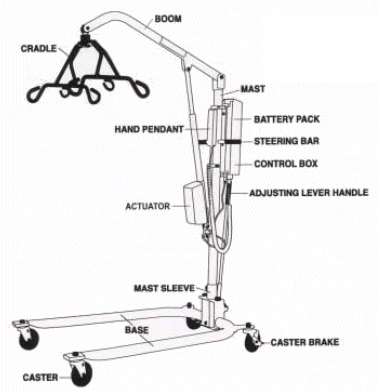
HOYER LIFT DIAGRAM
The Hoyer Lift:
- The boom lift does not swivel.
- Warning: the patient’s weight must be centered over the base legs at all times.
- Warning: make sure the legs lift are spread to its maximum to resist overturning
- Keep the patient facing you during the lift. This will help with verbal and visual cues.
- Manual vs. Powered: A Manual lift has hydraulic cylinders used to raise the patient via a hand-pump and a pressure release knob for lowering. A powered lift operates in the same manner but has a battery, push button and control.
The Sling:
The sling or most commonly used the U-Sling should be used fro transferring a patient from a bed. You should always refer to the sling manual before using on the patient. You can try folding the sling which can make for less work by the caregiver. To give the patient a secure feel wrap the sling around the thighs and cross between the legs.
Step 2: Communication
Whenever transferring a patient, explain to the patient how you will transfer the sequence in which you will transfer. This communication will make for a team effort that will result in decreasing accidental. This is important even if you have transferred someone before.
Step 3: Transferring from a Bed
If patient needs support and is in a hospital bed, raise side rails and have patient hold onto rails. Raise the level of the bed to the highest position before moving the patient onto the sling. This will reduce strain on the caregiver’s back. Also, when the patient is ready to be lifted, lower the side rail and the level of the bed, decreasing the distance the patient has to be elevated.

POSITIONING THE HOYER LIFT
Positioning the Lift for Use:
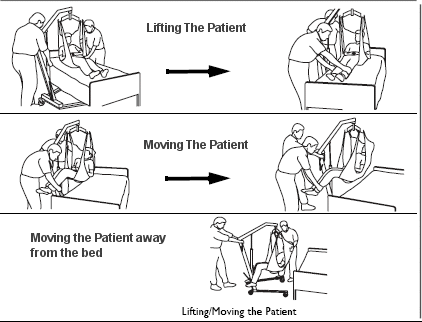
- With the legs of the base open to its maximum and locked, use the steering handle to push the Hoyer lift into proper position.
- Lower the patient lift for easy attachment of the sling to the patient.
- When the patient is clear of the bed surface, swing their feet off the bed.
- Using the steering handle, move the lift away from the bed.
- When moving the patient lift away from the bed, turn the patient so that he/she faces assistant operating the patient lift.
- Press the DOWN button (electric) or open the control valve (manual/hydraulic) lowering patient so that his feet rest on the base of the lift, straddling the mast. Close the control valve.
- Transfer patient to activity.
- Once transfer is complete, move the Hoyer Lift out of travelled areas to reduce tripping hazards.

USING THE HOYER LIFT
